Yoga is a wonderful practice that can benefit people of all shapes and sizes. For those who are overweight or dealing with obesity, yoga offers a gentle and effective way to improve flexibility, strength, and overall well-being. In this article, we will explore the top 10 yoga poses specifically tailored for overweight individuals to help them embark on their yoga journey.
1. Child’s Pose (Balasana):
Balasana, also known as Child’s Pose, is a popular yoga pose that is often used for relaxation and as a resting pose during a yoga practice.
Child’s Pose is a restful and relaxing pose that stretches the lower back, hips, and thighs. It’s a great way to start your yoga practice and can be modified with a wider stance to accommodate a larger body.
chart describing the process of Balasana, also known as Child’s Pose, in yoga:
| Step | Description |
|---|---|
| 1 | Start in a kneeling position on your yoga mat. |
| 2 | Sit back on your heels, toes touching, knees hip-width apart. |
| 3 | Take a deep breath and as you exhale, bend forward at your hips. |
| 4 | Extend your arms in front of you, palms down. |
| 5 | Rest your forehead on the mat, or as close to it as comfortable. |
| 6 | Relax your shoulders, neck, and back. |
| 7 | Keep your hips resting on your heels. |
| 8 | Breathe deeply and hold the pose for 30 seconds to several minutes. |
| 9 | To release, gently walk your hands back towards your body. |
| 10 | Slowly sit up on your heels and return to a kneeling position. |
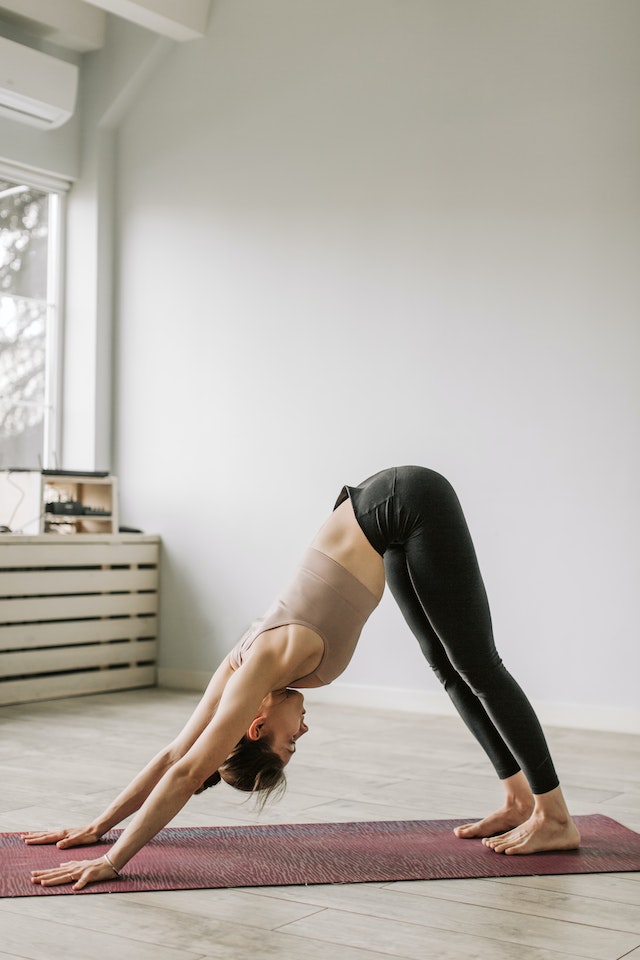
2. Downward-Facing Dog (Adho Mukha Svanasana):
This iconic yoga pose not only strengthens the upper body and core but also provides a good stretch for the entire body. Using props like blocks can make it more accessible.
Steps of this Asana:
| Step | Instructions |
|---|---|
| 1 | Start on your hands and knees in a tabletop position. Align your wrists under your shoulders and your knees under your hips. |
| 2 | Spread your fingers wide, with your middle fingers pointing forward. |
| 3 | Tuck your toes under, exhale, and lift your knees off the floor, straightening your legs. |
| 4 | Begin to push your hips up and back, creating an inverted “V” shape with your body. |
| 5 | Keep your arms straight and engage your shoulder blades by drawing them down your back. |
| 6 | Press firmly into your palms and distribute your weight evenly between your hands and feet. |
| 7 | Lengthen your spine by reaching your tailbone toward the ceiling while keeping your heels on or slightly lifted off the floor. |
| 8 | Gently pedal your feet by bending one knee at a time to stretch your calves and hamstrings. |
| 9 | Keep your head in line with your arms, and gaze towards your navel or between your thighs. |
| 10 | Breathe deeply and hold the pose for 30 seconds to 1 minute, or longer if comfortable. |
| 11 | To release, exhale and bend your knees, lowering them to the floor. Return to the tabletop position. |
Remember to breathe deeply and relax into the pose. Adho Mukha Svanasana is a rejuvenating yoga pose that can help strengthen your arms and legs while providing a gentle stretch for your entire body.
3. Cat-Cow Pose (Marjaryasana-Bitilasana):
Cat-Cow is a gentle warm-up that improves spinal flexibility and helps relieve back pain. It’s particularly beneficial for those with excess weight in the abdominal area.
Here’s a step-by-step process for Marjaryasana (Cat Pose) and Bitilasana (Cow Pose), often performed together as a flowing sequence, presented in a table format:
| Step | Marjaryasana (Cat Pose) | Bitilasana (Cow Pose) |
|---|---|---|
| 1 | Start on your hands and knees in a tabletop position. Align your wrists under your shoulders and your knees under your hips. | Same as Marjaryasana. |
| 2 | Inhale, arch your back, and lift your tailbone towards the ceiling. Let your belly drop down toward the floor. Lift your head and gaze forward. This is Bitilasana (Cow Pose). | Exhale, round your back like a cat, tuck your chin to your chest, and draw your belly button toward your spine. This is Marjaryasana (Cat Pose). |
| 3 | Flow between these two poses with your breath. | Flow smoothly with your breath, moving between Cat Pose and Cow Pose for several rounds, syncing your movements with your breath. |
| 4 | Inhale to Bitilasana (Cow Pose), opening your chest and looking forward. | Exhale to Marjaryasana (Cat Pose), rounding your back and tucking your chin. |
| 5 | Continue this dynamic movement for 1-3 minutes, coordinating your breath with each transition. | Continue the flow, maintaining a gentle and rhythmic pace. |
| 6 | To finish, return to a neutral tabletop position. | To finish, return to a neutral tabletop position. |
This sequence of Marjaryasana and Bitilasana is often used in yoga as a warm-up or to increase spinal flexibility and mobility. Remember to focus on your breath and the fluidity of the movement as you flow between these two poses.
4. Bridge Pose (Setu Bandha Sarvangasana):
Bridge Pose strengthens the back, glutes, and hamstrings while opening up the chest and hip flexors. It can be adjusted for comfort and stability.
Steps:
| Step | Instructions |
|---|---|
| 1 | Start by lying on your back with your knees bent and feet hip-width apart, flat on the floor. Place your arms alongside your body with your palms facing down. |
| 2 | Press your feet and arms firmly into the floor. Inhale, and as you exhale, engage your core and lift your hips off the floor towards the ceiling. |
| 3 | Roll your shoulders back and underneath your body, interlocking your fingers if possible. If not, keep your palms flat on the floor. |
| 4 | Keep your thighs parallel to each other, and your knees directly above your heels. Your body should form a straight line from your shoulders to your knees. |
| 5 | Press down through your feet and lift your chest slightly towards your chin without putting too much weight on your neck. |
| 6 | Breathe deeply and hold the pose for 30 seconds to 1 minute, keeping your neck and throat relaxed. |
| 7 | To release, exhale and gently lower your spine back to the floor, one vertebra at a time. |
| 8 | Hug your knees to your chest and rock from side to side to release any tension in your lower back. |
| 9 | Roll to one side and use your hands to help you sit up slowly. |
Setu Bandha Sarvangasana is a great pose for strengthening the back, thighs, and glutes while also stretching the chest, neck, and spine. It can also help relieve stress and mild depression.
5. Warrior II (Virabhadrasana II):
This powerful pose promotes strength and stability in the legs while enhancing focus and balance. It’s adaptable for various body sizes.
Here’s a step-by-step process for Virabhadrasana II (Warrior II Pose) presented in a table format:
| Step | Instructions |
|---|---|
| 1 | Begin in a standing position at the top of your mat, with your feet together and arms at your sides (Mountain Pose). |
| 2 | Take a step back with your left foot, about 3 to 4 feet, and turn your left foot out at a 90-degree angle. Your right foot should still be pointing forward. |
| 3 | Inhale and extend your arms out to the sides, parallel to the floor, with your palms facing down. |
| 4 | Exhale and bend your right knee, bringing it directly over your right ankle. Your right thigh should be parallel to the floor, creating a 90-degree angle with your calf. |
| 5 | Turn your head to the right and gaze over your right fingertips. Keep your torso facing the side, with your shoulders relaxed and away from your ears. |
| 6 | Press firmly through the outer edge of your left foot, keeping your left leg straight and strong. |
| 7 | Lengthen your tailbone toward the floor and engage your core muscles to maintain stability. |
| 8 | Hold Warrior II for 30 seconds to 1 minute, breathing steadily. |
| 9 | To release, straighten your right knee, turn your feet to face forward, and lower your arms to your sides. |
| 10 | Repeat on the other side by stepping your right foot back and bending your left knee. |
Virabhadrasana II is a powerful pose that helps improve strength, balance, and concentration. It also stretches the legs and opens the hips. Be sure to maintain proper alignment, with your knee directly over your ankle, and keep your upper body relaxed but engaged.
6. Seated Forward Bend (Paschimottanasana):
Seated Forward Bend stretches the entire back and helps alleviate tension in the lower back. A strap or towel can be used to reach your feet comfortably.
Here’s a step-by-step process for Paschimottanasana (Seated Forward Bend) presented in a table format:
| Step | Instructions |
|---|---|
| 1 | Start by sitting on your mat with your legs extended straight in front of you. Ensure your feet are flexed, with your toes pointing up towards the ceiling. |
| 2 | Sit up tall, lengthening your spine, and engage your core muscles. |
| 3 | Inhale as you raise your arms overhead, lengthening your spine even more. |
| 4 | Exhale as you hinge at your hips and bend forward from your pelvis. Keep your back straight as long as possible. |
| 5 | Reach forward toward your toes with your hands. You can hold your toes, ankles, or shins, depending on your flexibility. |
| 6 | Keep your chest open, and your shoulders relaxed away from your ears. |
| 7 | Continue to breathe deeply and slowly. With each exhalation, try to deepen the stretch by inching your hands closer to your feet. |
| 8 | Hold this pose for 30 seconds to 1 minute or longer if comfortable. |
| 9 | To release, inhale as you lift your torso back up to a seated position with a straight spine. |
| 10 | Exhale and lower your arms to your sides. |
| 11 | Relax and take a few breaths in the seated position before moving on. |
Paschimottanasana is a wonderful yoga pose for stretching the entire back of the body, including the hamstrings, lower back, and spine. It also promotes relaxation and can be a great way to calm the mind. Remember to approach this pose gradually, especially if you’re a beginner, and avoid forcing yourself into it.
7. Tree Pose (Vrksasana):
Tree Pose enhances balance, concentration, and leg strength. It’s a perfect way to develop stability at your own pace.
Here’s a step-by-step process for Vrksasana (Tree Pose) presented in a table format:
| Step | Instructions |
|---|---|
| 1 | Begin in a standing position at the top of your mat, with your feet together and arms at your sides (Mountain Pose). |
| 2 | Shift your weight onto your right foot and ground it firmly into the floor. |
| 3 | Bend your left knee and bring the sole of your left foot to the inside of your right thigh. Your left heel should be as close to your groin as comfortable, with your toes pointing downward. |
| 4 | Find your balance and stability in this position. |
| 5 | Inhale as you raise your arms overhead, palms facing each other. Keep your gaze focused on a fixed point in front of you to help with balance. |
| 6 | Keep your shoulders relaxed and your chest open. |
| 7 | Engage your core muscles for stability, and ensure your standing leg is strong. |
| 8 | Hold the pose for 30 seconds to 1 minute or longer if comfortable. |
| 9 | To release, exhale as you lower your arms and gently lower your left foot back to the floor. |
| 10 | Return to Mountain Pose, standing on both feet, and take a few breaths to reset before repeating on the other side. |
| 11 | Shift your weight onto your left foot and repeat the process with your right leg. |
Vrksasana (Tree Pose) is a balancing pose that helps improve concentration, balance, and leg strength. It also encourages a sense of grounding and stability. Be sure to focus on your breath and find a drishti (gazing point) to help you maintain your balance.
8. Chair Pose (Utkatasana):
Chair Pose targets the legs and glutes and can be modified by placing your hands on your hips for added support. It’s excellent for building leg strength.
Here’s a step-by-step process for Utkatasana (Chair Pose) presented in a table format:
| Step | Instructions |
|---|---|
| 1 | Start by standing at the top of your mat with your feet together and arms at your sides (Mountain Pose). |
| 2 | Inhale as you raise your arms overhead, palms facing each other. |
| 3 | Exhale and bend your knees, as if you’re sitting back into a chair. Keep your knees in line with your ankles and thighs as parallel to the floor as possible. |
| 4 | Shift your weight back into your heels, so you can wiggle your toes at the front of your mat. |
| 5 | Tuck your tailbone slightly to engage your core muscles and maintain a neutral spine. |
| 6 | Keep your chest lifted and your shoulders relaxed away from your ears. |
| 7 | Gaze straight ahead or slightly upward. |
| 8 | Hold the pose for 30 seconds to 1 minute, or longer if comfortable. Continue to breathe deeply and evenly. |
| 9 | To release, inhale as you straighten your legs and return to a standing position with your arms at your sides. |
| 10 | Exhale and lower your arms to your sides. |
Utkatasana (Chair Pose) is a powerful standing yoga pose that strengthens the legs, tones the core muscles, and improves posture. It can be challenging, so make sure to focus on your breath and maintain awareness of your body’s alignment while practicing this pose.
9. Cobra Pose (Bhujangasana):
Cobra Pose stretches the chest and strengthens the back muscles. It’s a gentle backbend that can be done with variations to accommodate your body size.
Here’s a step-by-step process for Bhujangasana (Cobra Pose) presented in a table format:
| Step | Instructions |
|---|---|
| 1 | Start by lying on your stomach on your yoga mat with your legs extended and the tops of your feet flat on the mat. |
| 2 | Place your hands flat on the mat next to your shoulders, fingers pointing forward. Your elbows should be close to your body. |
| 3 | Press the tops of your feet, thighs, and pelvis into the mat to create a firm foundation. |
| 4 | Inhale as you gently lift your head, chest, and upper abdomen off the mat. Keep your gaze forward or slightly upward, without straining your neck. |
| 5 | Use the strength of your back muscles, not your arms, to lift your upper body. Keep your elbows slightly bent. |
| 6 | Roll your shoulders back and down, opening your chest. Imagine pulling your chest forward. |
| 7 | Continue to breathe deeply and hold the pose for 15 to 30 seconds, or longer if comfortable. |
| 8 | To release, exhale as you lower your upper body back down to the mat, one vertebra at a time. |
| 9 | Rest your head to one side, and take a few deep breaths in this position. |
Bhujangasana (Cobra Pose) is a gentle backbend that helps strengthen the back muscles and improve spinal flexibility. It’s important to engage the muscles of your lower back and avoid using your arms to push yourself up too high. Focus on lengthening your spine and opening your chest while practicing this pose.
10.Corpse Pose (Savasana):
Savasana is a relaxation pose that concludes your yoga practice. It’s essential for calming the mind and reducing stress, allowing you to fully embrace the benefits of yoga.
Here’s a step-by-step process for Savasana (Corpse Pose) presented in a table format:
| Step | Instructions |
|---|---|
| 1 | Start by lying flat on your back on a yoga mat or a comfortable surface. |
| 2 | Keep your legs extended and your feet hip-width apart, allowing your toes to naturally fall to the sides. |
| 3 | Place your arms alongside your body with your palms facing up. Allow a slight distance between your arms and your torso. |
| 4 | Close your eyes gently and relax your facial muscles, including your jaw and forehead. |
| 5 | Take a few deep breaths to center yourself. Inhale through your nose, and exhale through your mouth, releasing any tension. |
| 6 | Let go of any conscious control over your breath. Allow it to return to its natural rhythm. |
| 7 | Scan your body for any areas of tension, and consciously release and relax those areas. |
| 8 | As you continue to lie still, focus your attention on your breath or on a specific point of relaxation, such as your heart center or the sensation of your breath entering and leaving your nostrils. |
| 9 | Remain in Savasana for 5 to 10 minutes or longer if desired. This is a time for complete relaxation and mental stillness. |
| 10 | To exit the pose, begin to deepen your breath. Gently move your fingers and toes, and slowly awaken your body. |
| 11 | Roll onto one side in the fetal position, using your arm as a pillow. Take a few breaths here. |
| 12 | Finally, use your hands to help you sit up slowly and mindfully, keeping your eyes closed if you prefer. |
Savasana is a deeply relaxing and restorative yoga pose that allows for total relaxation of the body and mind. It’s often practiced at the end of a yoga session to help integrate the benefits of your practice and promote deep relaxation.
Conclusion:
Yoga is a versatile and inclusive practice that can be tailored to suit the needs of individuals of all body types, including those who are overweight. These ten yoga poses offer a starting point for a yoga journey that prioritizes comfort, self-care, and self-acceptance. Always listen to your body, use props when needed, and consider seeking guidance from a qualified yoga instructor to make your yoga practice safe and enjoyable. Remember, yoga is about progress, not perfection, and it can be a valuable tool on your path to a healthier, more balanced life.
Pingback: New Study Reveals Risks of Liver Injury by Herbs In Ayush - Modern Health